How to Integrate JavaScript with Storyline 360?
Introduction
Elevate your eLearning game with the dynamic duo – Storyline 360 and JavaScript. Articulate Storyline, the industry-leading authoring tool, empowers you to craft engaging interactive experiences. But sometimes, its built-in functionalities just aren’t enough. Using JavaScript in articulate storyline 360, you unlock Pandora’s box of customization, personalization, and interactivity, taking your eLearning content development to the next level.
Follow our step-by-step tutorial video for a better understanding.
How to play background music continuously throughout the course in Articulate Storyline 2
Articulate Storyline provides maximum flexibility to customize interactivity with minimal effort. This web-based authoring tool enables you to add JavaScript, which can greatly enhance your eLearning courses. It’s relatively easy to extend and enhance the functionality of the built-in features in Storyline by default.
| Get in Touch |
| Looking for eLearning solutions? Contact us today to learn more. |
Case Study:
We recently faced a challenge while developing a course for a Registered Training Organization (RTO). The course content was presented in a simple form without any voice-over, and the target audience was aged between 20 and 30 years. To make the content more engaging, the client requested that we add background music to the course.
We encountered an issue when we embedded music into individual screens of the course. Each time the user clicked on the next screen, the music would start playing from the beginning. Even when we added the audio to the Master slide, the problem continued. We have successfully overcome this limitation by customizing the course with the help of JavaScript.
How to add a continuous background music in a Storyline 2?
By following the instructions below, you can play a single audio file throughout the entire course.
Here are the steps to be followed:
Step 1
Created a file called index.html in text editor (Notepad) and added the code.
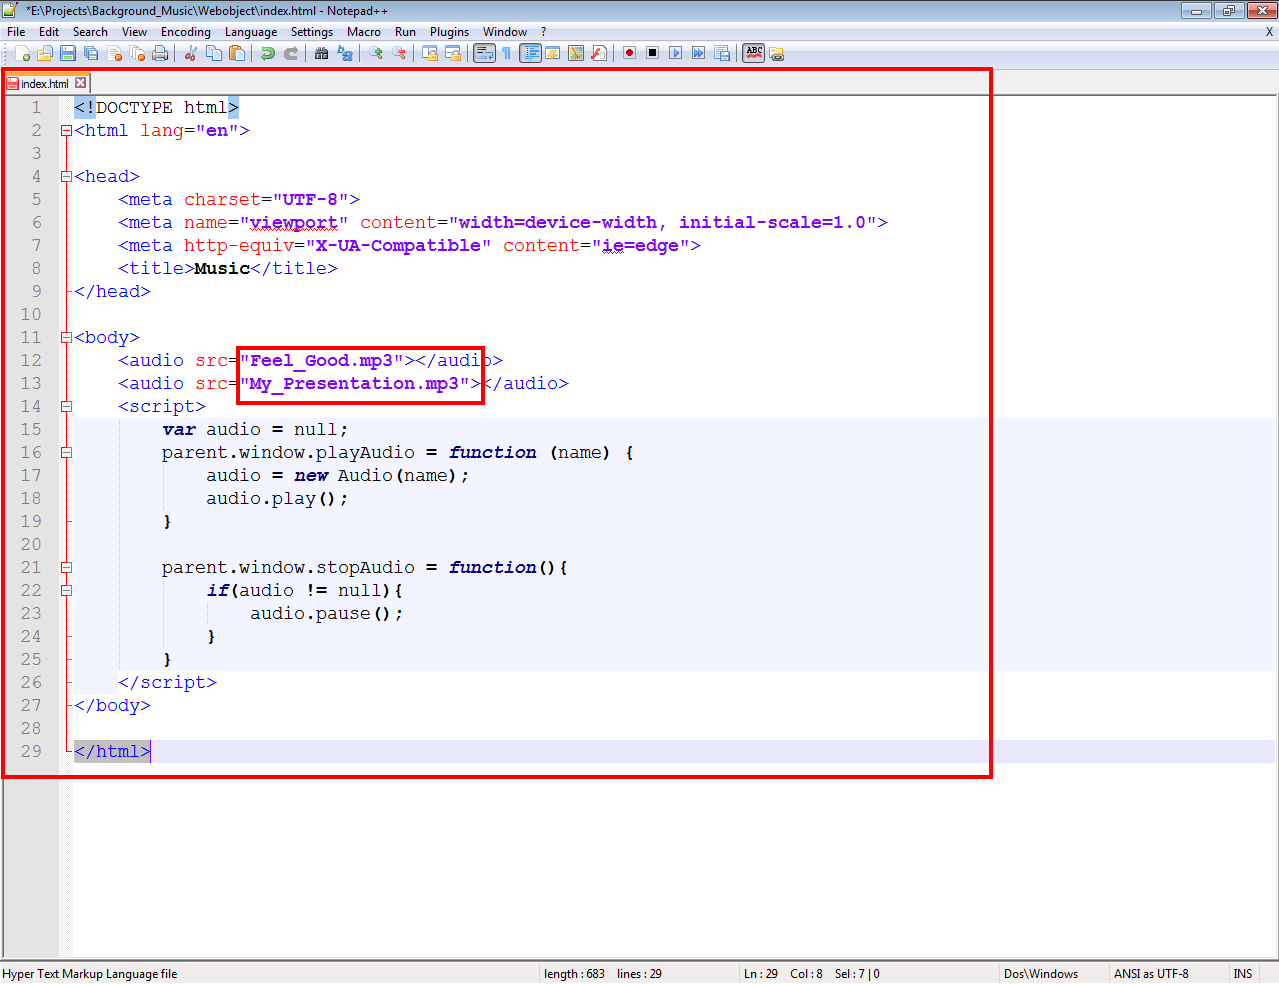
Step 2
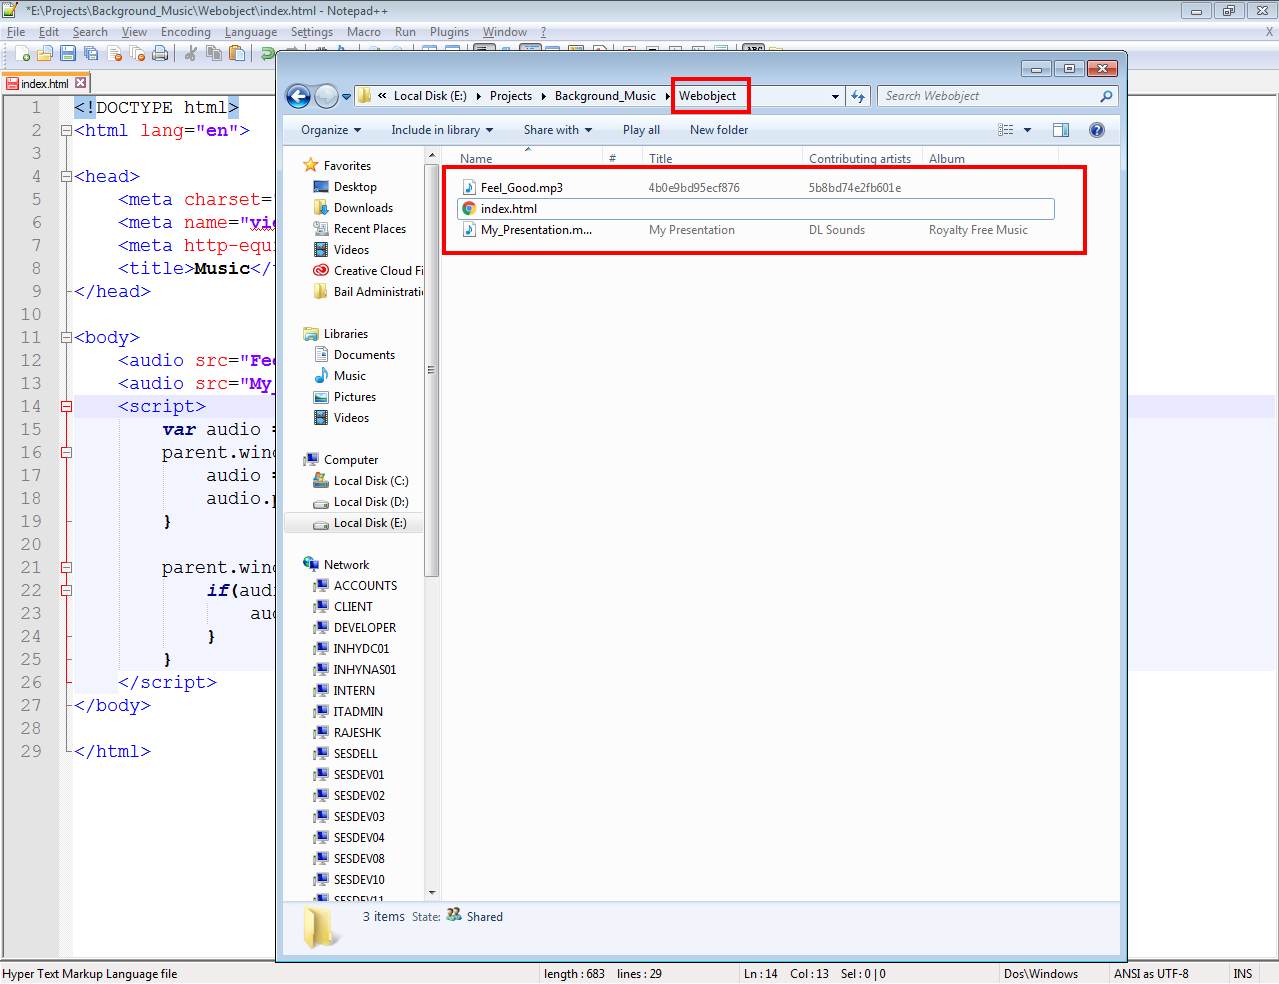
Place the audio files in the same folder.
Step 3
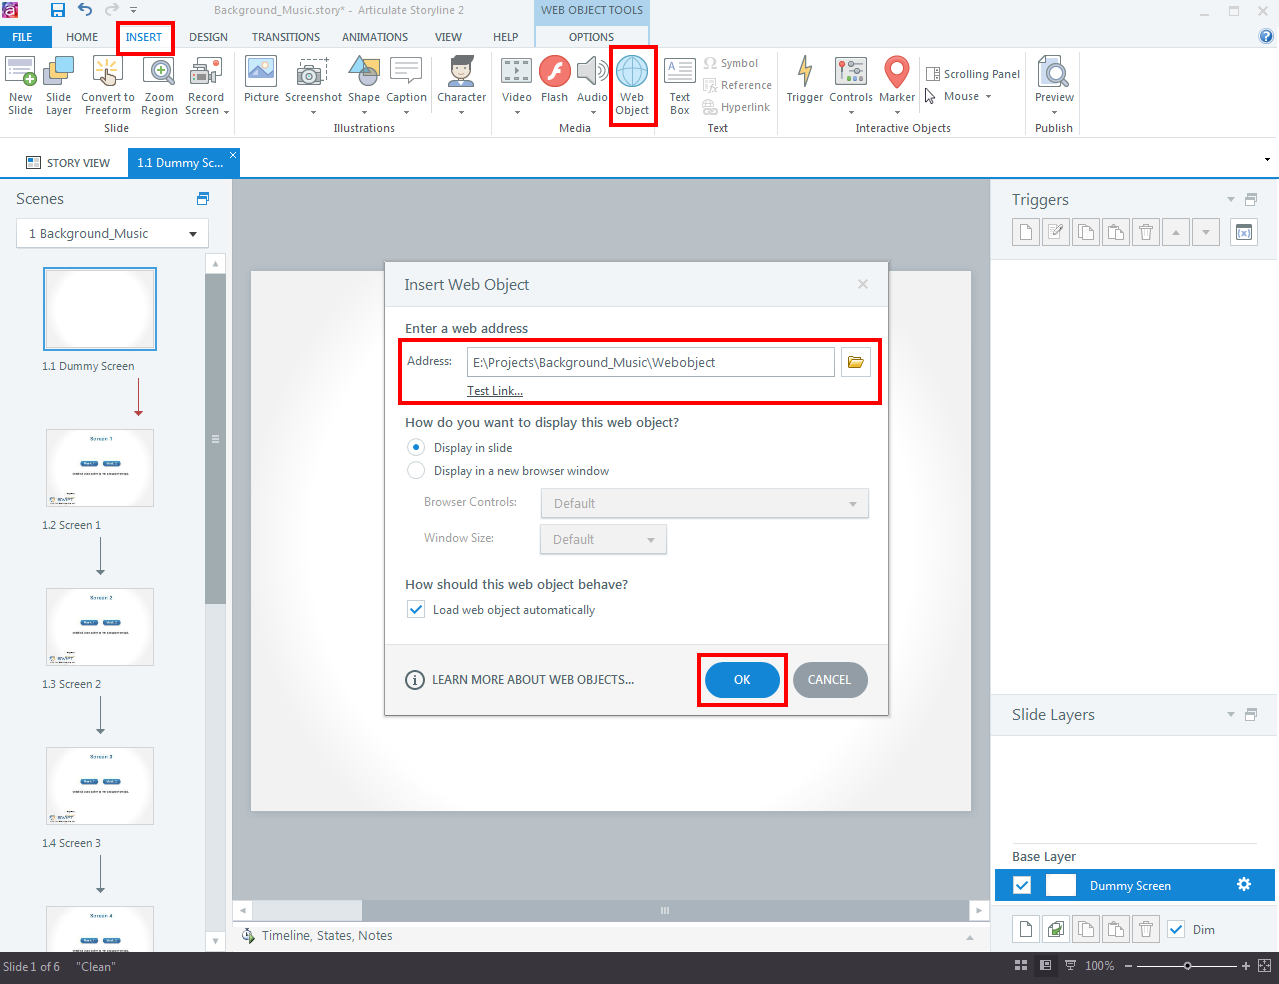
Open Articulate Storyline 2. Click on “INSERT” tab and select “Web Object”. Browse the folder location and click “Ok”.
Step 4
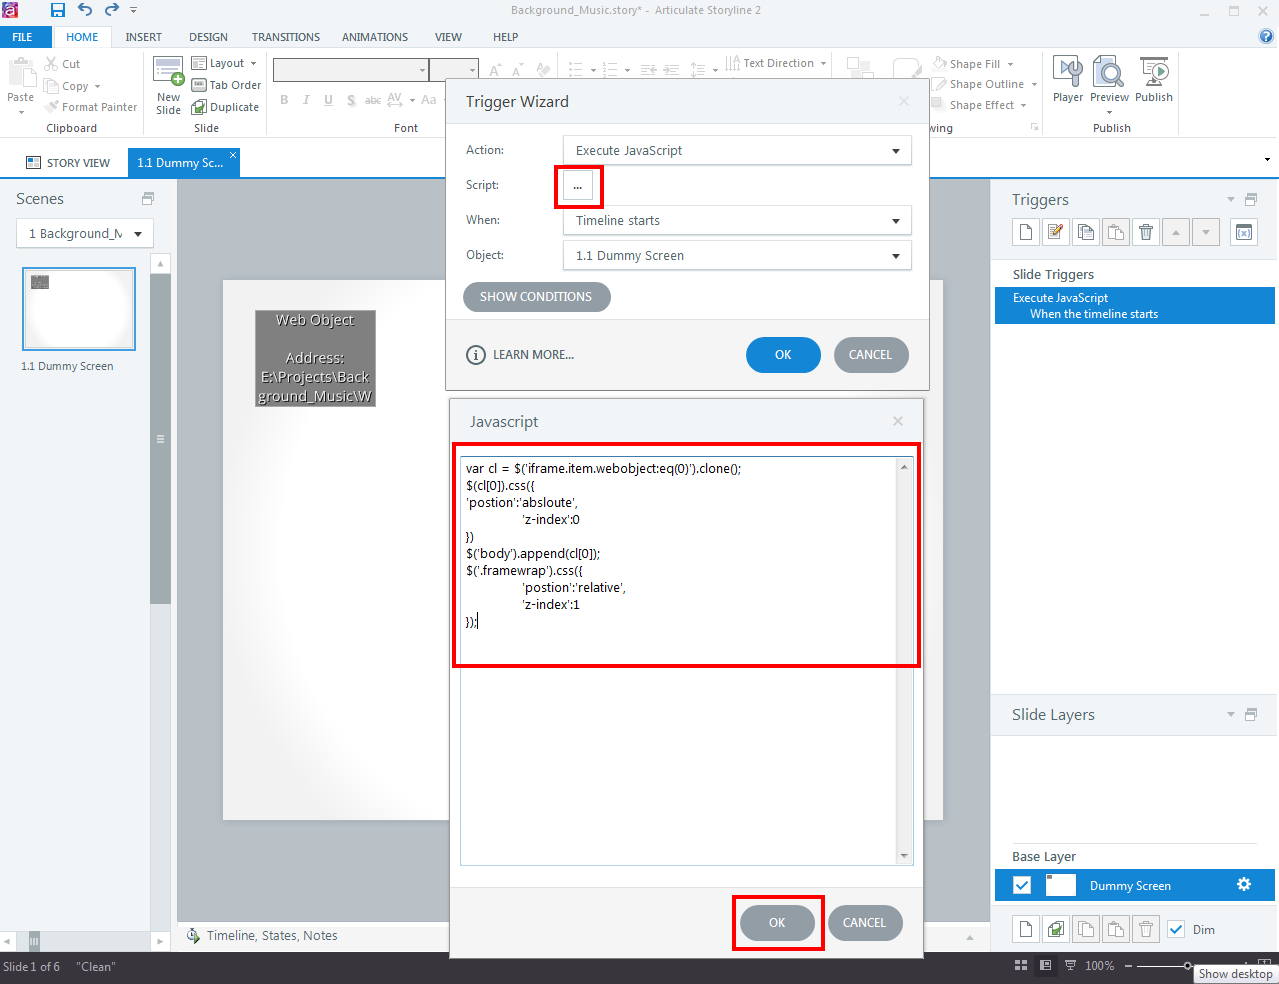
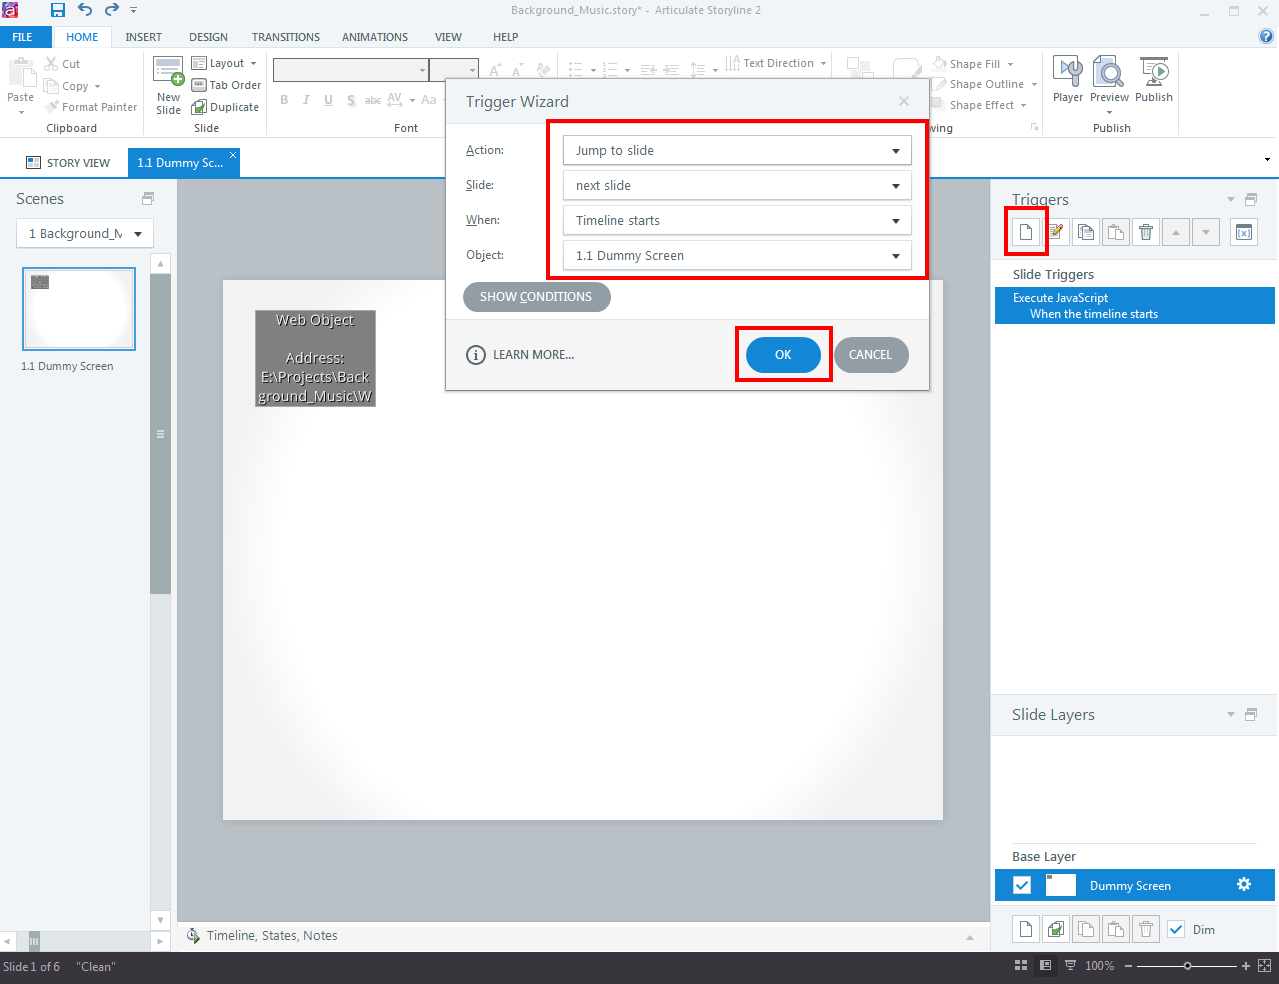
Create a new trigger. You will see a “Trigger Wizard” pop-up appearing. Click on “Action” dropdown icon and select “Execute JavaScript”.

Step 5
From “Script” just below “Action”, write the JavaScript in the given whitespace and click “Ok”. In “When” field select “Timeline starts”.
Step 6
Create a new trigger and set action, jump to the next slide when timeline starts.
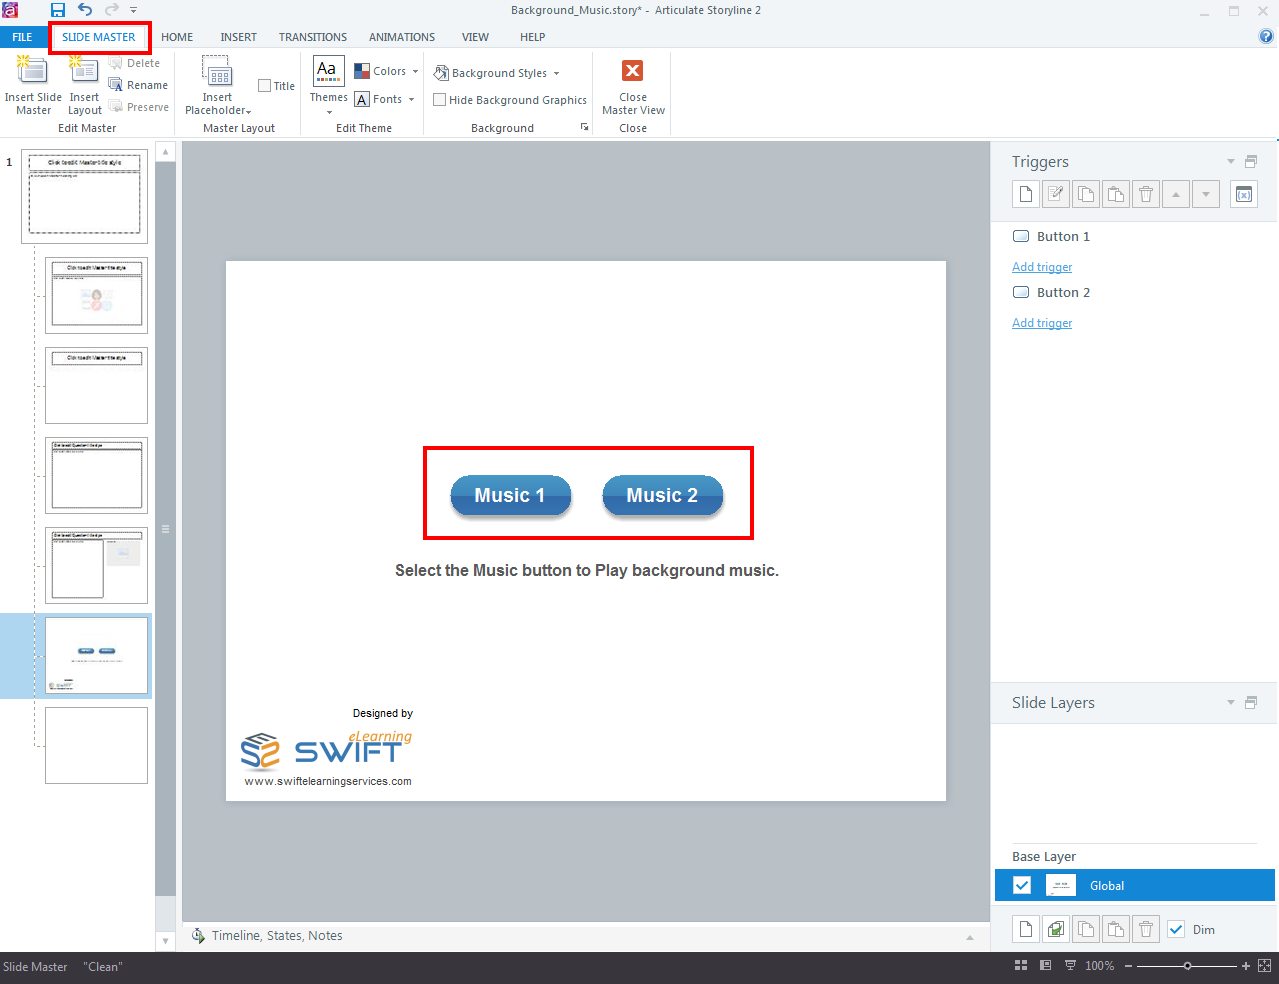
Step 7
Now select the “SLIDE MASTER” and insert buttons.
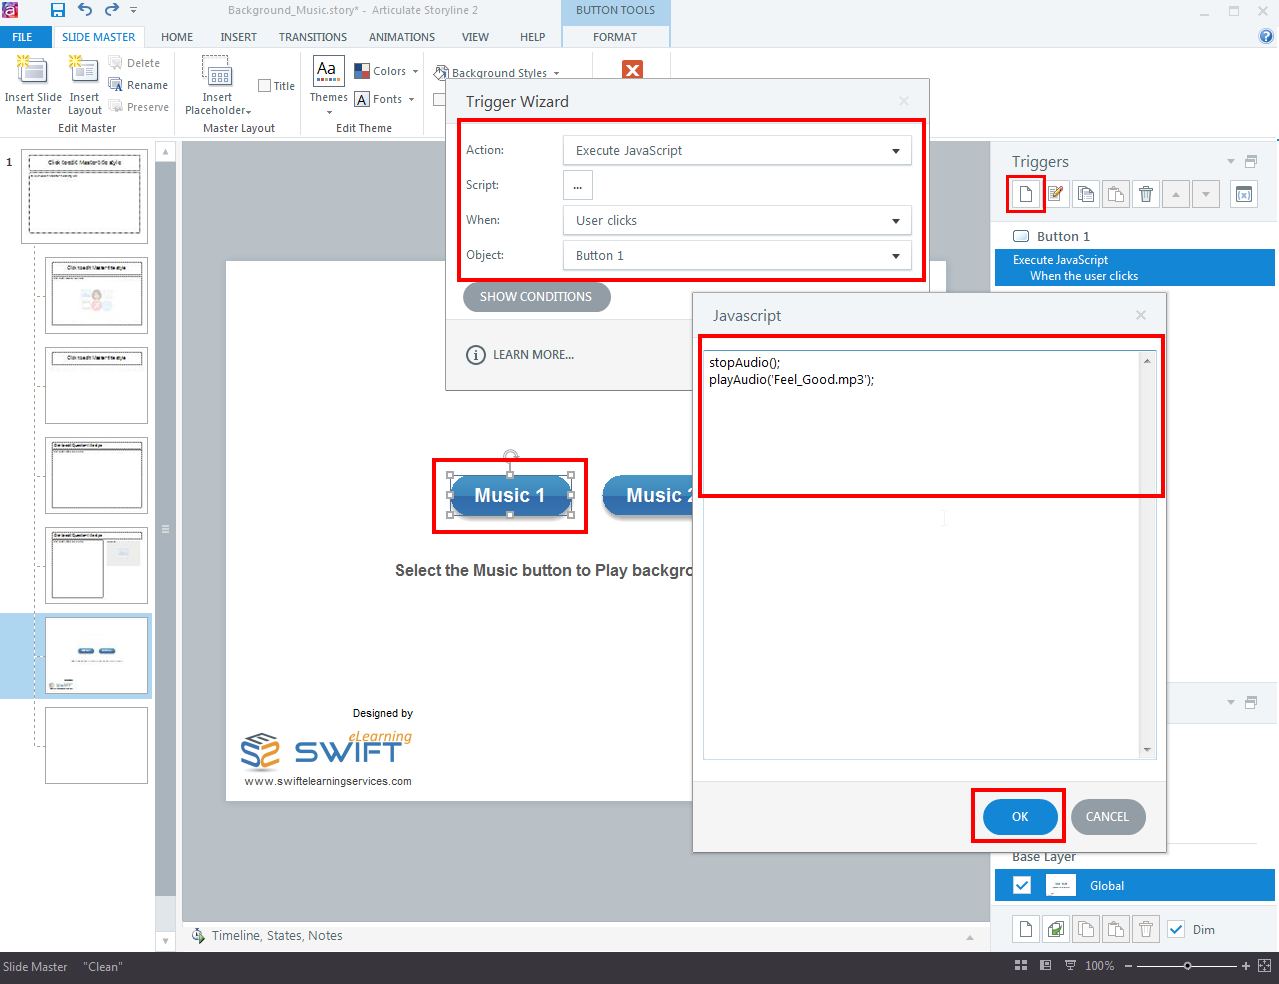
Step 8
Select button and create a new trigger. In “Script” field write the code and click “Ok”. In “When” field, select “Timeline starts”. You can do the same for second button.
var cl = $(‘iframe.item.webobject:eq(0)’).clone();

$(cl[0]).css({

‘postion’:’absloute’,

‘z-index’:0

})

$(‘body’).append(cl[0]);

$(‘.framewrap’).css({

‘postion’:’relative’,

‘z-index’:1

});
Button 1
stopAudio();

playAudio(‘Feel_Good.mp3’);
Button 2
stopAudio();

playAudio(‘ My_Presentation.mp3’);
Note:
- This does not work in preview mode
- This does not work in offline mode for chrome
- This functionality works only when you host the course on a server
Frequently Asked Questions (FAQs)
1. How do you loop audio in Articulate Storyline?
You can loop audio in Articulate Storyline by following these steps:
- Select the slide that contains the audio you want to loop.
- Go to the “Audio Tools” tab on the Storyline ribbon.
- Click on the “Edit” button in the “Audio” section to open the audio editor.
- Click on the “Loop” button in the audio editor. This will set the audio to loop continuously.
- Preview the slide to ensure that the audio is looping correctly.
2. How do you add music to Articulate Storyline?
To add music to Articulate Storyline, follow these steps:
- Go to the slide where you want to add music.
- Click on the “Insert” tab on the top menu.
- Click on the “Audio” option in the media group.
- Select “Audio from file” option and browse to the audio file you want to use.
- Select the audio file and click on the “Open” button.
- The audio file will be added to the slide, and you can preview it by clicking on the “Preview” button in the audio tools.
3. How do you loop a video in Articulate Storyline?
To loop a video in Articulate Storyline, follow these steps:
- Insert the video into your slide by going to the Insert tab and selecting Video.
- Once the video is inserted, click on it to select it.
- In the Video Tools Format tab, select Loop Playback under the Video Options group.
- Preview the slide to ensure the video is looping correctly.
4. What are the prerequisites for using JavaScript in Storyline 360?
Basic knowledge of JavaScript, understanding the Storyline 360 environment, and access to the JavaScript trigger.
5. Are there limitations to using JavaScript in Storyline 360?
While powerful, JavaScript integration in Storyline 360 has some limitations, such as potential security concerns and compatibility issues.
6. How can I troubleshoot JavaScript-related issues in Storyline 360?
Utilize debugging tools, check for syntax errors, and ensure your scripts comply with Storyline 360’s environment for effective troubleshooting.
7. Does Articulate support JavaScript integration in Storyline 360?
While Articulate doesn’t officially support custom JavaScript, developers can leverage the platform’s open environment to integrate and experiment.
Conclusion
Integrating JavaScript with Storyline 360 is a game-changer in eLearning content development, empowering developers to create interactive and personalized educational experiences. By understanding the intricacies and potential of this integration, creators can unlock new dimensions in the world of digital learning.
How to add custom course timer in articulate storyline 3 or 360?
State animations – How to add animations to images or shapes?
Articulate Storyline 360 – Free Training Tutorials
Swift ELearning Services provides a valuable opportunity for individuals who are enthusiastic about acquiring skills in the use of Articulate Storyline 360, a popular e-learning authoring tool. The company offers free tutorials that are designed to enhance the learning experience of users, making it easy for them to navigate the software and create high-quality e-learning content.
| Get in Touch |
| Are you looking for custom content providers to outsource the e-learning course productions? |
Articulate Storyline 360 is a powerful tool that enables users to create interactive and engaging e-learning courses. However, it can be challenging for beginners to master the various features and capabilities of the software. Swift ELearning Services recognized this challenge and created a solution by providing free tutorials that aim to simplify the learning process.
Through these free tutorials, individuals can access valuable resources that will help them understand the intricacies of Articulate Storyline 360. The tutorials cover a wide range of topics, including how to create animations, interactions, and assessments, among others. By following the step-by-step instructions, users can learn how to create compelling e-learning courses that meet their specific needs.
Please click on the below link to view our Articulate Storyline training videos.

Hi, I need to test it but I don’t own a server, may I try it on something like ScormCloud or TempShare ?
https://blogs.articulate.com/word-of-mouth/get-your-storyline-projects-online-with-tempshare/
Do I need to put the WebObject in the ZIP after?
Hi Alexandre,
Yes, it works on ScormCloud or TempShare.
You only need to add the WebObject with Storyline.
Hello, how can I write a JavaScript code that creates random numbers from one to ten so that by clicking on a button, this JavaScript command does not repeat the code that it generates, for example, if it shows three for the first click, in the next click three are do not be shown. thanked
Here is the link to one of our blog which should answer your requirement.
https://www.swiftelearningservices.com/random-numbers-in-articulate-storyline-3/
Would this work if the deliverable needs to be launched in MindTickle (we can only add a zipped SCORM file in MindTickle)?
Dear Luisa,
Thanks for posting your comment.
Yes, after making changes as per the blog steps output file can be hosted on your MindTickle platform.
Hopefully you have followed the steps described on the blog.
If you need any further information/ support then please let us know.
I followed your instructions, and now my course feels so much more engaging with background music. My students love it! Do you have any other tips for making e-learning courses more interactive and captivating?
That’s fantastic to hear that your students are loving the background music in your custom e-learning course! Click here for a few more tips to make your Articulate Storyline courses even more interactive and captivating.