How to create a custom HTML5 timeline using JavaScript for Articulate Storyline 360

Importance of timelines in eLearning courses
Timelines play a crucial role in eLearning courses by providing a visual representation of information organized chronologically. They help learners understand history, projects, or steps. Timelines make learning easier by showing information clearly.
Additionally, they enhance interactivity and learner engagement by allowing learners to explore content at their own pace and interact with multimedia elements such as images, videos, and interactive features.
Know about HTML5 and JavaScript
HTML5, or Hypertext Markup Language version 5, is the latest iteration of the HTML standard used to create and structure content on the World Wide Web. It provides a set of markup tags and attributes that define the structure and layout of web pages, including text, images, links, forms, and multimedia elements.
JavaScript is a programming language commonly used in web development to add interactivity, dynamic behavior, and functionality to web pages. It runs client-side in a web browser, allowing developers to create interactive elements, handle user input, manipulate the HTML DOM (Document Object Model), and communicate with web servers asynchronously. JavaScript is often used alongside HTML and CSS to create rich, interactive web applications.
What are the Benefits of Custom HTML5 Timelines?
HTML5 timelines are visual representations of events or information arranged in chronological order using HTML5, a coding language for creating web content. They allow users to see the sequence of events or steps in a clear and organized way.
The benefits of custom HTML5 timelines include:
1. Enhanced Interactivity: Custom HTML5 timelines allow for interactive elements such as clickable markers, tooltips, and animations, which engage learners and make learning more dynamic.
2. Tailored Design: With custom HTML5 timelines, you can design the timeline to match the branding and aesthetics of your eLearning course, creating a cohesive and visually appealing learning experience.
3. Flexibility: Custom HTML5 timelines offer flexibility in layout, allowing you to customize the size, shape, and arrangement of timeline elements to suit your specific content and instructional goals.
4. Multimedia Integration: You can incorporate various multimedia elements such as images, videos, audio clips, and interactive content into custom HTML5 timelines, enriching the learning experience and catering to different learning styles.
5. Improved Retention: By presenting information in a visual and interactive format, custom HTML5 timelines help learners retain and recall key concepts more effectively, leading to improved learning outcomes.
6. Accessibility: Custom HTML5 timelines can be optimized for accessibility, ensuring that learners with disabilities can access and interact with the timeline content using assistive technologies.
We have revised the code to align with the latest version of Storyline 360 and the newest browser updates.
Please click the button below to be redirected to the latest blog post.
Overview of Articulate Storyline 360
Articulate Storyline is a popular e-Learning authoring tool known for its user-friendly workflow in developing courses. It is suitable for both beginners and experts due to its familiar interface, which is similar to Microsoft PowerPoint. Articulate Storyline uses a component called the “Player” in which the eLearning courses are played. This player contains global controls such as Menu, resources, slide navigation controls, volume control, slide timeline, and more.
Storyline default player controls are often insufficient for many eLearning developers, who prefer to create a custom Graphical User Interface (GUI) for player controls that are tailored to their clients’ needs. Fortunately, Storyline allows us to fully customize the default player using the “Player Settings” option. However, there is one specific control that Storyline doesn’t allow much customization, which is the course timeline or seekbar.
The seekbar in Articulate Storyline 360 can be customized in terms of color, but it cannot be relocated from its default location. This limitation has led many developers to choose to remove the seekbar functionality altogether to achieve a completely customized appearance for their e-learning courses.
Our Client Requirement
One of our recent projects for a client based in Canada, we made a decision to remove the seekbar from the e-learning course. However, upon delivering the course, the client expressed dissatisfaction with our decision and insisted on having a customized seekbar included in the course that functions similarly to the default seekbar. According to the client feedback, having a seekbar was crucial for learners to navigate the course easily and monitor their progress.
Our Solution
To achieve this functionality, we have developed a seekbar widget specifically for Storyline 360 projects. This widget can be placed anywhere on the screen and functions like the default storyline timeline slider/seekbar.
In this blog post, we will explain how to use our seekbar widget in any Articulate Storyline 360 projects. Before we explore the process, let’s take a look at the music player we have built using custom elements.
Click the Preview button to see the sample and click the Download button for the source files.
Step 4
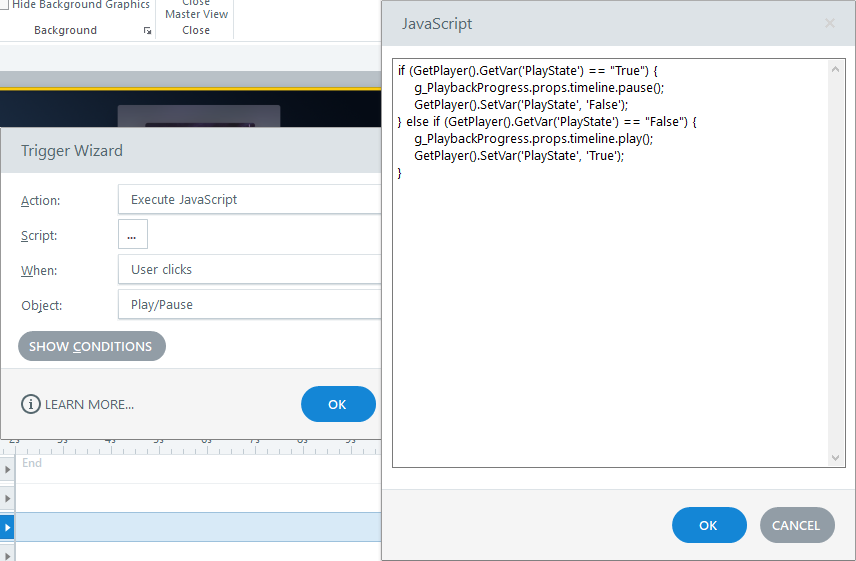
Finally, add a trigger to the Play/Pause button to “Execute JavaScript” when “User clicks” on it.”
Add the following JavaScript Code in the JavaScript window.
if (GetPlayer().GetVar(‘PlayState’) == “True”) {
g_PlaybackProgress.props.timeline.pause();
GetPlayer().SetVar(‘PlayState’, ‘False’);
} else if (GetPlayer().GetVar(‘PlayState’) == “False”) {
g_PlaybackProgress.props.timeline.play();
GetPlayer().SetVar(‘PlayState’, ‘True’);
}
It is important to replace the “app.min.js” file with the updated version after publishing the course, before testing the project.
How to add a custom volume controller?
We have also included a custom volume controller in our music player. For those interested in implementing this feature in their projects, we have published separate blog posts that detail the process for both Storyline 2 and 3, as well as Articulate Storyline 360.
Please feel free to check the blogs below.
Custom Volume Control – Articulate Storyline 3 or Articulate Storyline 360
How to Create Custom Volume Controls in Articulate Storyline 2?
Note:
The above-mentioned custom elements are only supported in HTML5 output and not compatible with the Flash version.
When accessing the published output from your local drive, it is recommended to use Firefox browser to view the project. Google Chrome browser may block access to local files when viewing an HTML page without HTTP protocol.
The above approach is only applicable for modern browsers such as Firefox, Chrome, and Safari. Internet Explorer 11 and older versions are not supported.
If you encounter any issues while using these custom elements, please leave a comment below and we will be happy to assist you.

Frequently Asked Questions (FAQs)
1. What are timelines in Articulate Storyline?
Timelines in Articulate Storyline are visual representations of the duration and sequence of objects on a slide. They enable you to control the timing of various elements on a slide, such as text, images, and animations. Timelines can be customized to create interactive e-learning courses that engage learners and enhance their comprehension of the content.
2. How do you add a timeline to Articulate Storyline?
To add a timeline in Articulate Storyline, go to the slide where you want to add it and click “Insert” in the Storyline ribbon. Select “Timeline” in the “Media” section. Customize it by adding events, adjusting duration, and adding markers. Right-click to add events and markers. Drag the endpoint handles to adjust duration.
3. How to Publish Storyline 360 as HTML5?
To publish Storyline 360 as HTML5, follow these steps:
1. Click “Publish” in the Storyline 360 ribbon.
2. Select “Web” and then “HTML5” as the output format.
3. Adjust other settings as needed.
4. Click “Publish” and wait for the process to finish.
5. Open the “story.html” file in the output folder to view the HTML5 output.
Your Storyline 360 project is now published as HTML5 output and can be accessed in a web browser.
4. How do I change my timeline in Articulate Storyline?
To change your timeline in Articulate, follow these steps:
1. Open your project and go to the slide with the timeline.
2. Select the timeline and adjust its duration by dragging the endpoint handles.
3. To add or remove events, right-click on the timeline and select “Edit timeline.”
4. Add new events by clicking the “+” button, delete events with the “-” button, and adjust event timing by dragging them along the timeline.
5. Click “Save” to apply changes.
5. What interactive elements can be added to the timeline in Articulate Storyline 360?
While the HTML5 timeline itself won’t support direct interactivity within Articulate Storyline 360, you can use triggers and layers in Storyline to create interactive elements linked to the timeline events. This allows learners to explore additional content related to specific milestones.
6. What limitations or considerations should be taken into account when using custom HTML5 elements in Articulate Storyline 360?
Ensure that your custom HTML5 elements are compatible with Storyline’s output formats. Test your course thoroughly, especially if you plan to publish it for various devices or platforms.
7. How can I further customize the appearance of the timeline within Articulate Storyline 360?
Yes, you can. After embedding the HTML5 timeline, you have the flexibility to further customize its appearance using Storyline’s formatting and styling options. Experiment with colors, fonts, and animations to achieve the desired look.
8. Where can I find resources or tutorials to create a custom HTML5 timeline in Articulate Storyline 360?
You can find tutorials, templates, and community forums on the Articulate E-Learning Heroes website, as well as other e-learning communities. Additionally, various online resources and forums dedicated to HTML5 development can provide guidance on creating custom timelines for Articulate Storyline 360.
Articulate Storyline 360 – Free Training Tutorials
Swift ELearning Services provides free tutorials for Articulate Storyline 360. These tutorials cover various topics such as creating animations, interactions, and assessments, among others, to help users understand the software and create high-quality e-learning content.
Please click on the below image to view our Articulate Storyline training videos.

This custom seekbar works great when previewed in Firefox locally, but it’s not working for me when published to a server. It spins endlessly without loading the course. It does work with Chrome when published to a server. https://www.syniadlearning.com/wp-content/uploads/files/org_admin/story_html5.html
I see in the developer tools in FF that it’s showing this error: “SecurityError: The operation is insecure.” Then it lists many lines in the code as being insecure.
Any ideas what I can do to make this load correctly in Firefox?
Hi,
We have tested the provided link in firefox as well as in chrome. In both the versions it does works.
If possible share the version of your browser.
Hi Christy,
Can you shred the source file?
Hello Manish Kapoor,
You can download the source file by filling the opt-in form section “Preview / Download Sample”.
Hi Christy
Can you plz share a storyfile and output file. I am looking for the same and I am getting stuck in between. It would be great help if you can share me the files
Hello Rashmi,
Thanks for posting your comment.
You can download the source file by filling the opt-in form “Preview / Download Sample”.
After a lot of research, it seems that I found a real programmer, Thank you for sharing…
Can I use your project to jump to a specific frame in the timeline using javascript or something?
Dear Max,
Thanks for posting your comment.
Can you describe more and give an example about to know your requirement.
You can reach us at: [email protected].
Have a great day ahead.
Thanks
This is now working in updated Storyline 360 version.
Thanks for posting your comment, Krishna.
Hi team, I was trying to create custom seekbar, however I am getting stuck after this step: In the published output, navigate to the following path: Storyline output\html5\lib\scripts…. because when I navigate to this path , under scripts I dont find ‘app.min.js’. However I find this from the download section mentioned and when I am trying to paste this in the script nothing works. Could you plz help me with this.