Articulate Storyline Advanced Interactions: Plugin to Drag and drop With Ease

Storyline2_Drag_and_Drop_plugin

In most of the HTML5 eLearning authoring tools like Articulate Rise, Elucidat, Adapt etc., all the eLearning interactions including drag and drop are very elegant with subtle and smooth animations. I always prefer to have such smooth experience in Articulate Storyline’s HTML5 courses as well. Since it’s not a default feature in HTML5 version of Storyline,  I created a plugin specific for Articulate Storyline drag-and-drop interactions. In this blog, we will see how to use this plugin to enhance the user experience in Articulate Storyline. You can watch the video demo of the plugin and download it as well at the end of this blog.

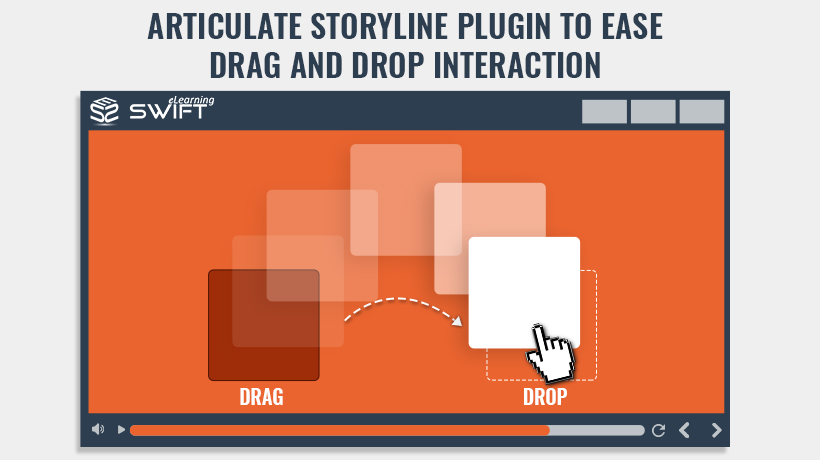
Before we dive into the process, let’s have look at the final outcome with help of the animation below.

Articulate Storyline Plugin to Drag and drop With Ease

Step 1

Download the plugin from the demo and unzip it.

Step 2

Build your drag-and-drop slide the way you want it to be.

Step 3

Once you finish building the slide, all you need to do is import the “Drag and Drop with Ease Storyline Plugin” folder as a “Web Object”.

Step 4

Once you import the plugin, by default, it covers up the slide. You can resize it and place it somewhere outside the slide. This is to ensure the plugin doesn’t appear on the slide, but still will be included in the publish to do its job behind the scenes.

Note: Do not hide it in the timeline.

That’s all you need to do. You can see the plugin do its magic in Storyline’s HTML5 output.

Note: This plugin is only for HTML5 output and will not work in flash output.

Step 5

If you want your LMS to run only HTML5, with Storyline 360, we have a direct option to choose between HTML5 and Flash before publish. If you’d like to know how this option works, Please feel free to take a look at our blog on Storyline 360 – New Publishing Formats.

But, if you are using Storyline 2 and you still want to use only HTML5 –Don’t worry, we can still do it with a little customization.

All you need to do is open index_lms.html in any text editor, and find the following code

if ((g_biOS || g_bAndroid) && true)
{
var strLocation = location.href.replace("index_lms", "index_lms_html5");
location.replace(strLocation);
}

And replace it with

if ((g_biOS || g_bAndroid) && true)
{
var strLocation = location.href.replace("index_lms", "index_lms_html5");
location.replace(strLocation);
}else{
var strLocation = location.href.replace("index_lms", "index_lms_html5");
location.replace(strLocation);
}

Once done, you can upload it to your LMS.


Our Services: eLearning Vendor, Convert PowerPoint to eLearning, eLearning Translation Services

7 replies
    • Swift Elearning Services
      Swift Elearning Services says:

      Hi Sunny,

      Thanks for posting your comment here.

      Can you please let us know how you are testing after placing the code?

      Thanks.

      Reply
    • Swift Elearning Services
      Swift Elearning Services says:

      Dear Max,

      Thanks for the comment.

      Can you please share screen grab or URL to investigate further.

      The demo or download URL appears to be working fine.

      Thanks and have a great day.

      Reply
  1. James
    James says:

    We’re excited to give the Advanced Interactions plugin a try and see how it can elevate our custom elearning development course design. Thanks for sharing your expertise!

    Reply

Leave a Reply

Want to join the discussion?
Feel free to contribute!

Leave a Reply to max Cancel reply

Your email address will not be published. Required fields are marked *