Custom eLearning and Digital Training Solutions Provider
  • Home
  • eLearning Services
    • Custom Elearning Solutions
    • Convert PowerPoint to eLearning
    • Rapid eLearning Development
    • Translation and Localization
    • Flash To HTML5 Conversion
    • Legacy Content Conversion
    • Mobile Learning
    • Gamified Learning Solutions
    • Blended Learning Solutions
  • Software Development
    • Learning Management System
    • Workforce Management System
    • Human Resource Management System
    • Bug Tracker Software
    • Custom Software Development
  • Contact Us
  • Blog
  • Search
  • Menu Menu
  • 0Shopping Cart
  • Home
  • eLearning Services
    • Custom Elearning Solutions
    • Convert PowerPoint to eLearning
    • Rapid eLearning Development
    • Translation and Localization
    • Flash To HTML5 Conversion
    • Legacy Content Conversion
    • Mobile Learning
    • Gamified Learning Solutions
    • Blended Learning Solutions
  • Software Development
    • Learning Management System
    • Workforce Management System
    • Human Resource Management System
    • Bug Tracker Software
    • Custom Software Development
  • Contact Us
  • Blog

How to create branched interactions in Latest Adobe Captivate

Click or tap on the play button below to watch the video for easier understanding.

Branched interactions are a type of eLearning activity that allows learners to make choices and follow different paths through the learning material. This can help to create a more engaging and personalized learning experience, and to better assess learners’ progress.

In this blog, we will guide you through a step-by-step process for implementing branched interactions in the latest version of Adobe Captivate.

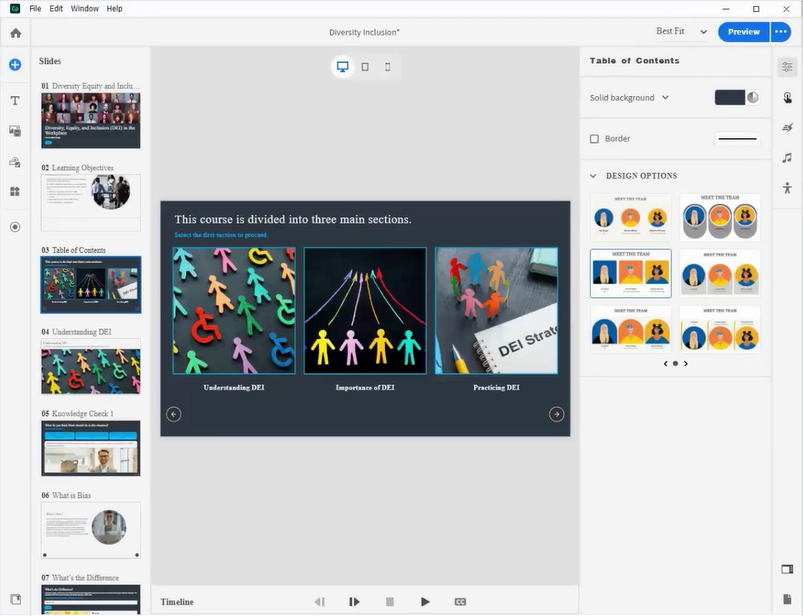
Step 1: 

Open Adobe Captivate course and create a slide with three clickable buttons, include a “Next and Previous” buttons for navigation.
adobe captivate

Step 2: 

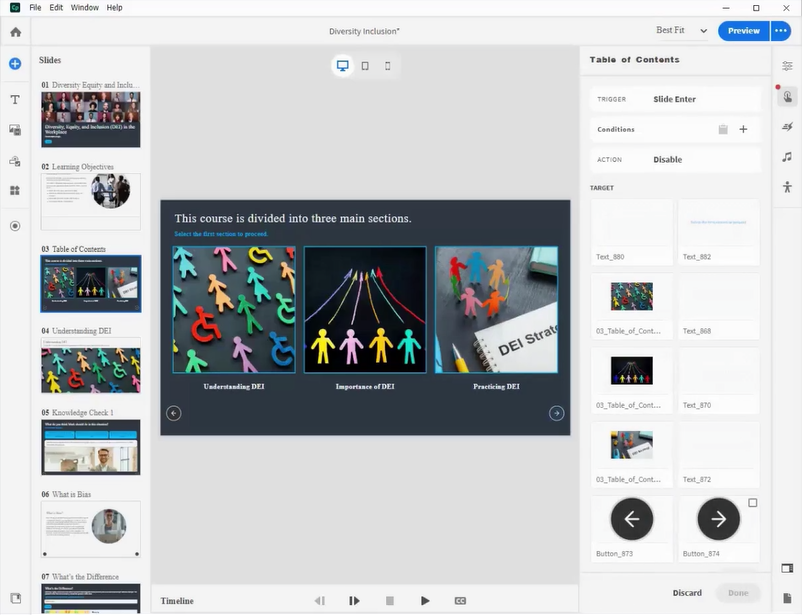
Disable the “Next” button on the “Table of Contents” by utilizing the “Add an Interaction” on the right side of the panel.
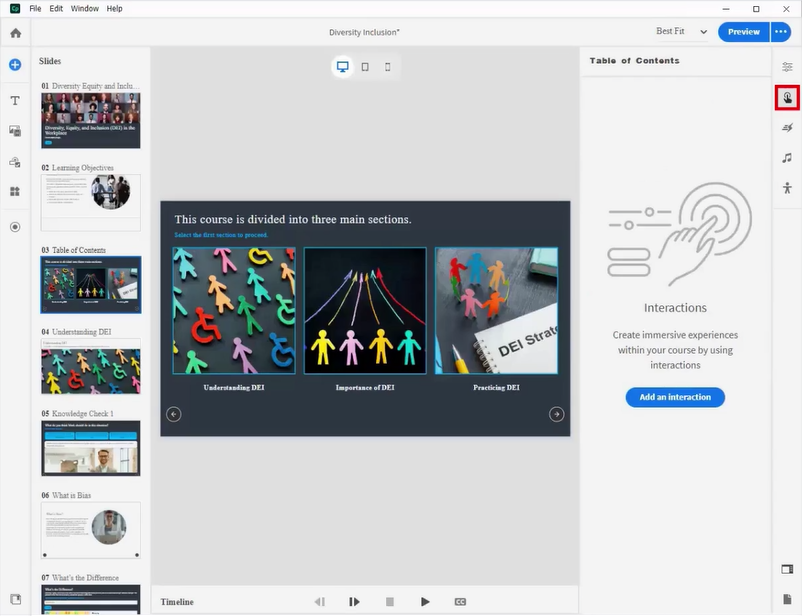
adobe captivate

Step 3: 

Click the “Add an Interaction” button.
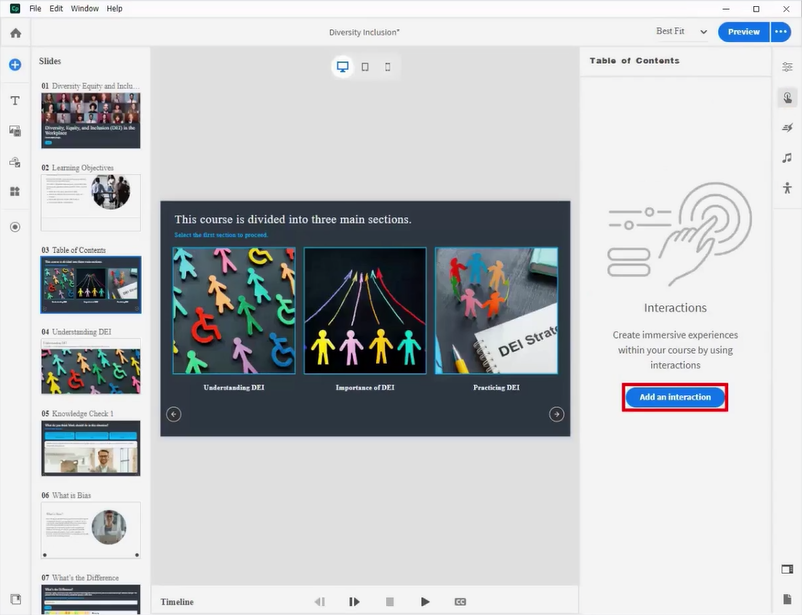
adobe captivate

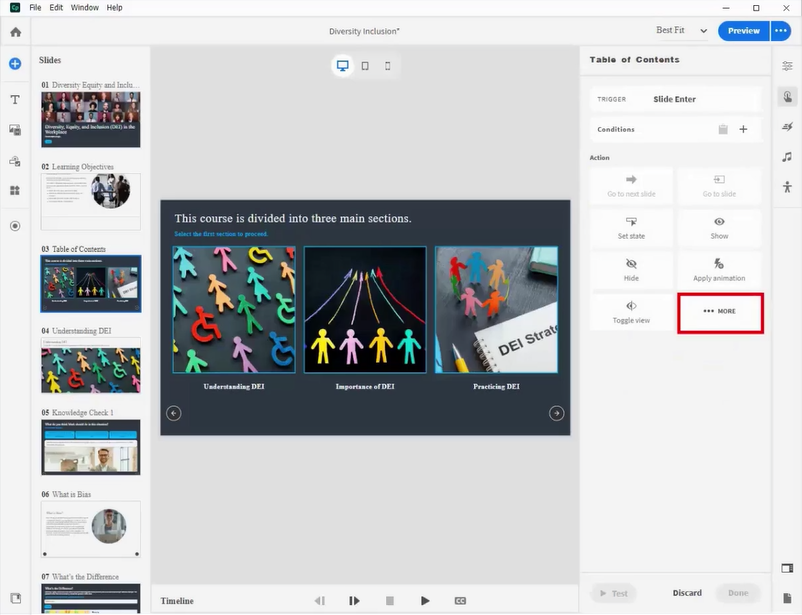
Step 4: 

Select the “Slide Enter” option and click on “More“.
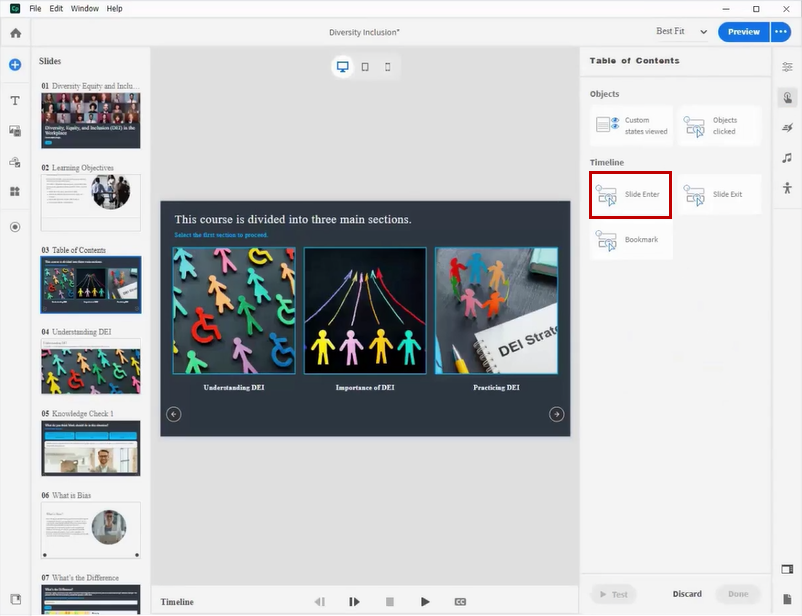
adobe captivate

adobe captivate

Step 5: 

Select “Disable” from the list.
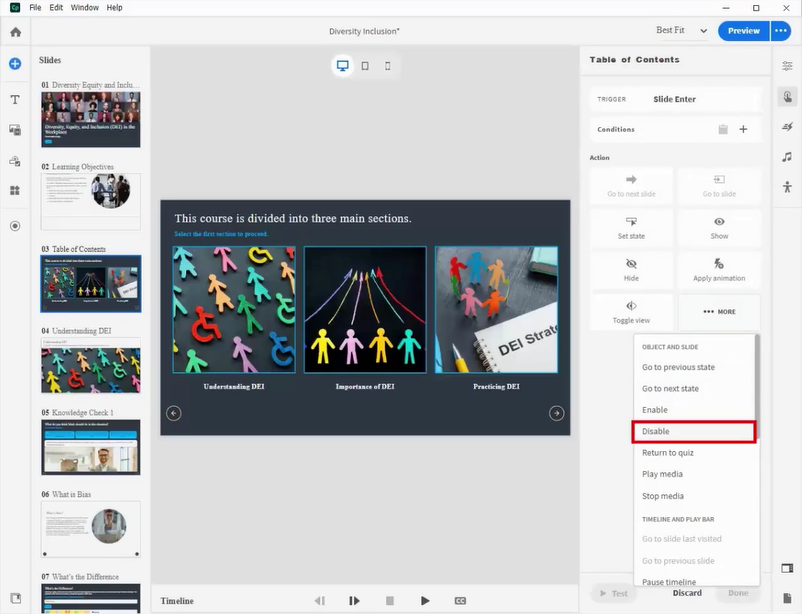
adobe captivate

Step 6: 

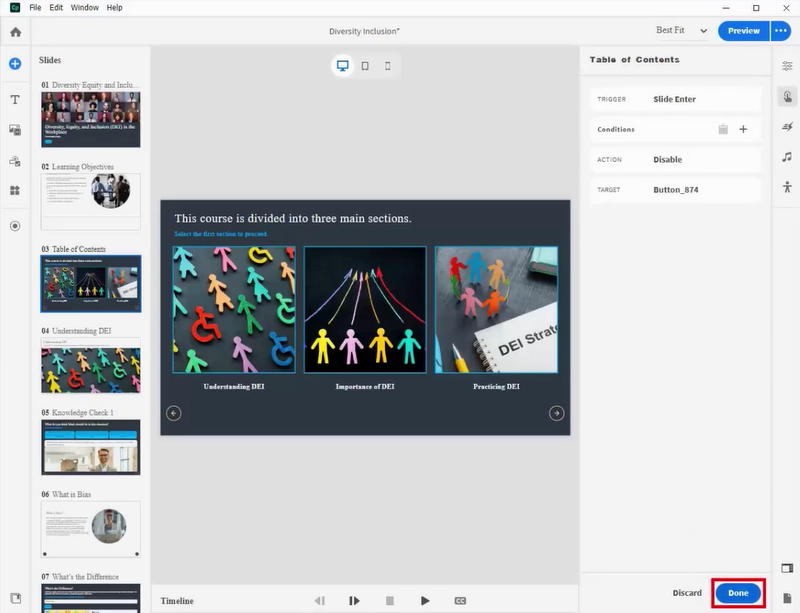
After selecting the “Next” button from the target list, click the “Done” button to save the changes.
adobe captivate

adobe captivate

Step 7: 

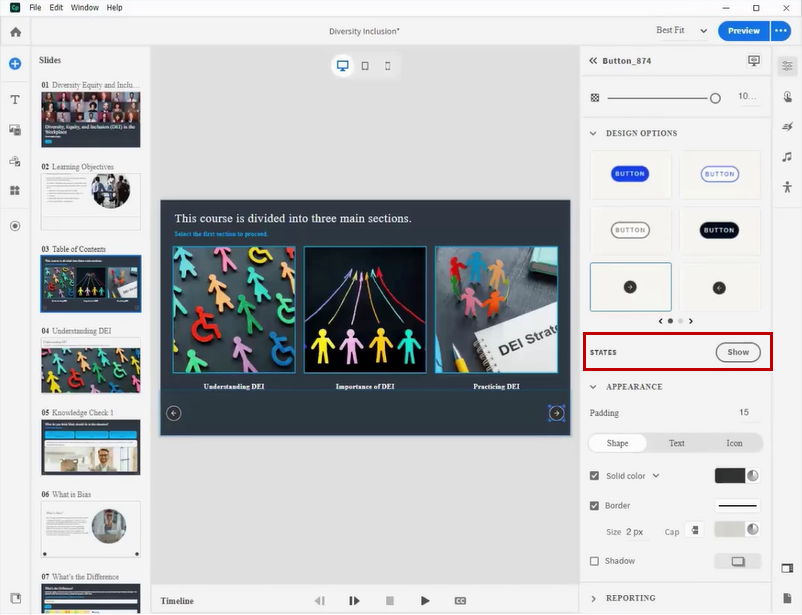
Choose the “Next” button and modify its visual state by clicking the “Show” button on the right-side panel.
adobe captivate

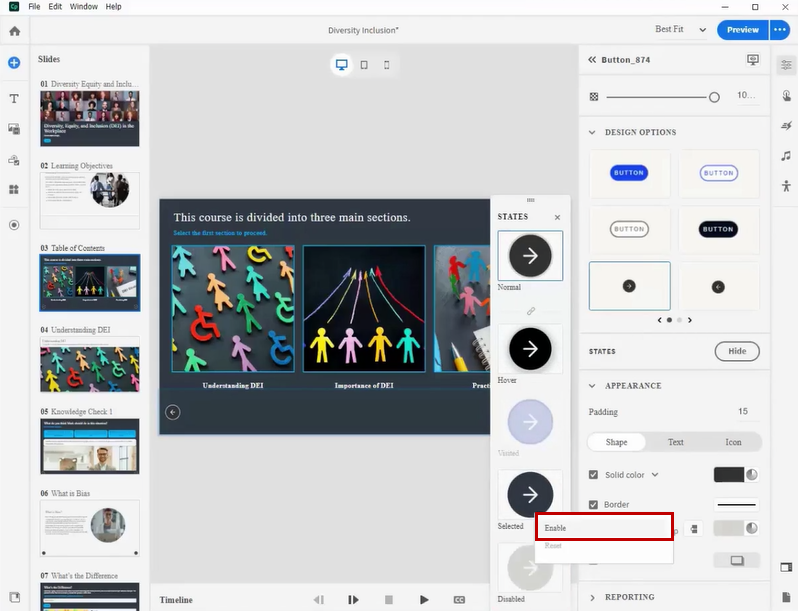
Step 8: 

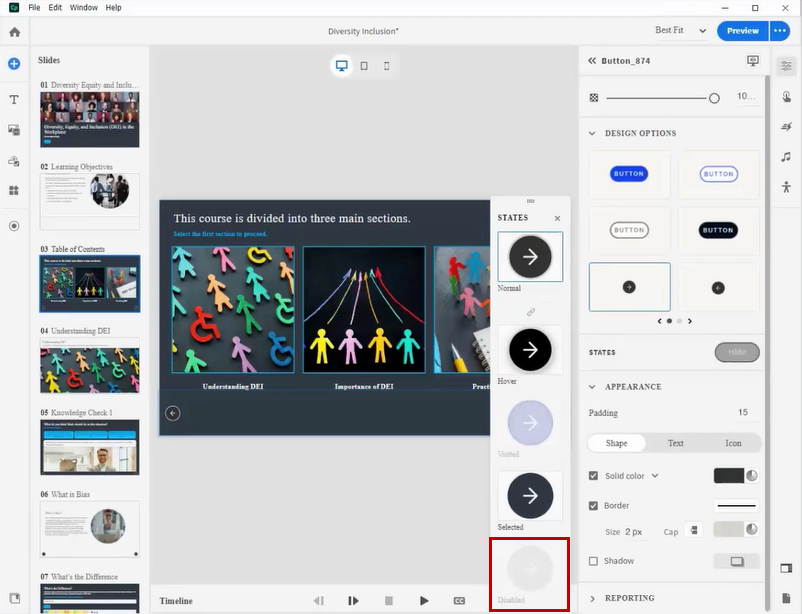
Right-click on the “Disable” state in the list and choose “Enable”
adobe captivate

adobe captivate

Step 9: 

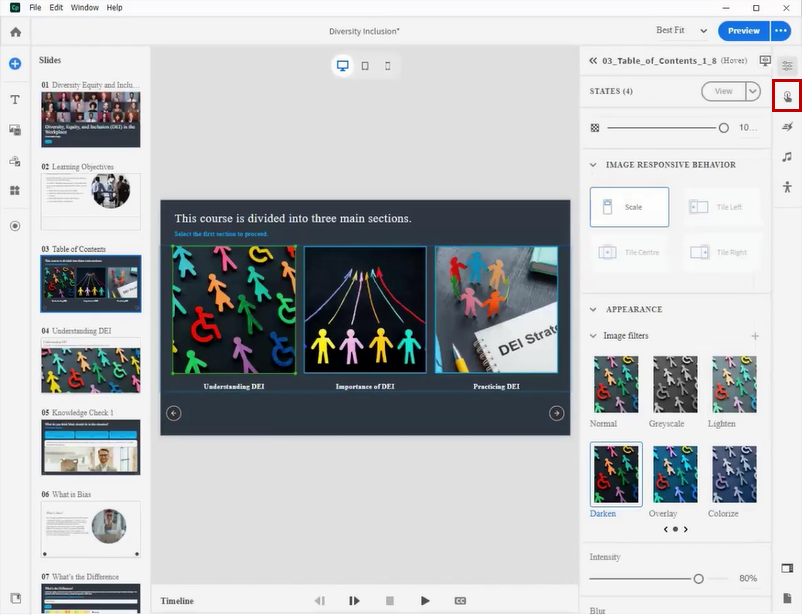
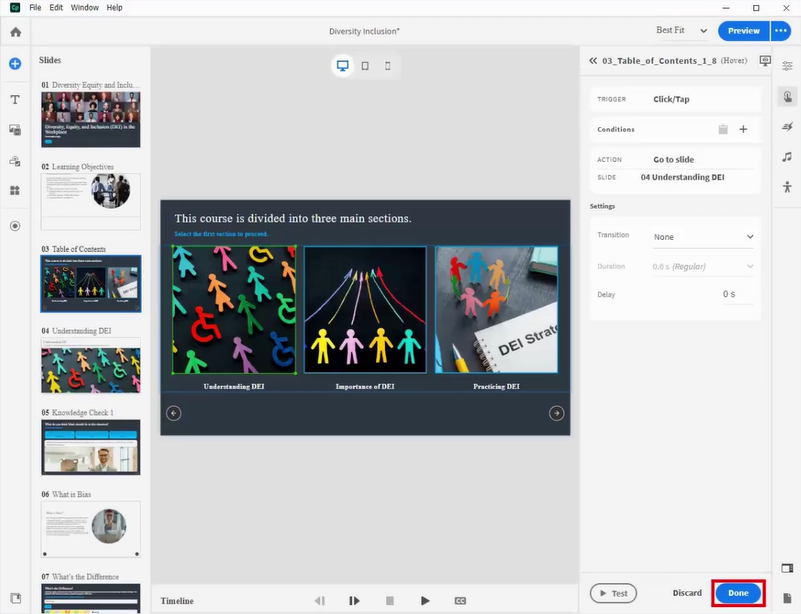
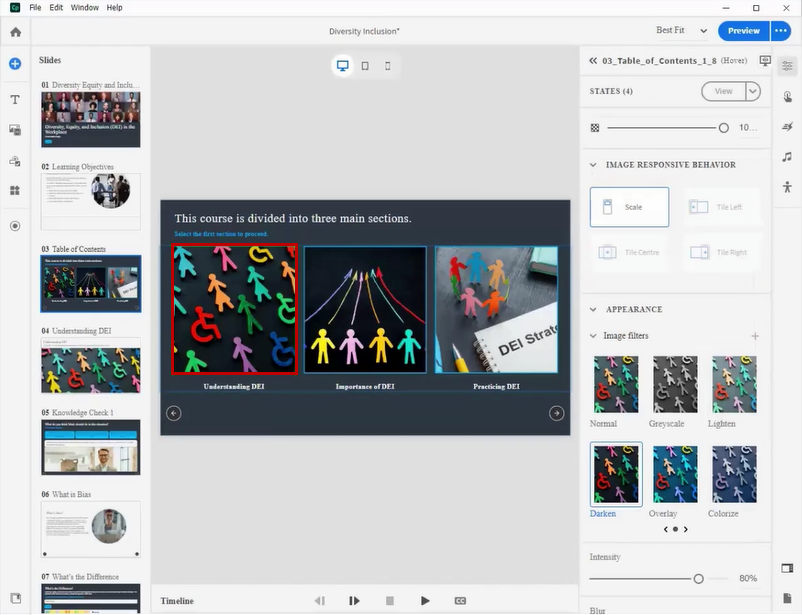
Select the first button and click the “Add an interaction” icon.
adobe captivate

adobe captivate

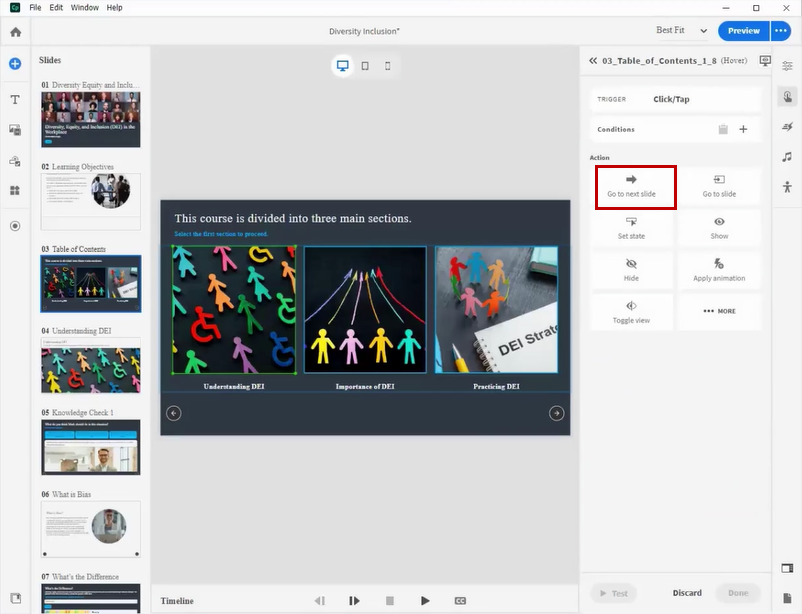
Step 10: 

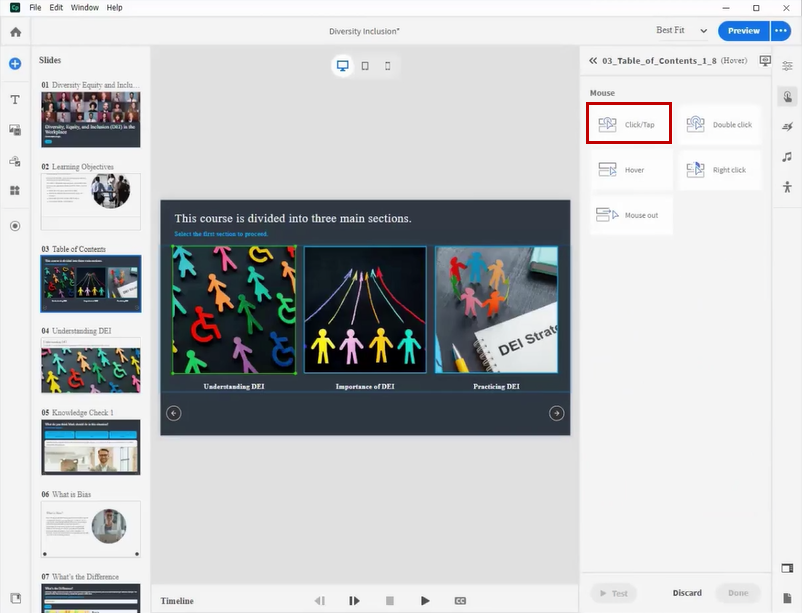
Choose “Click/tap” from the list and opt for the “Go to next slide” action.
adobe captivate

adobe captivate

Step 11: 

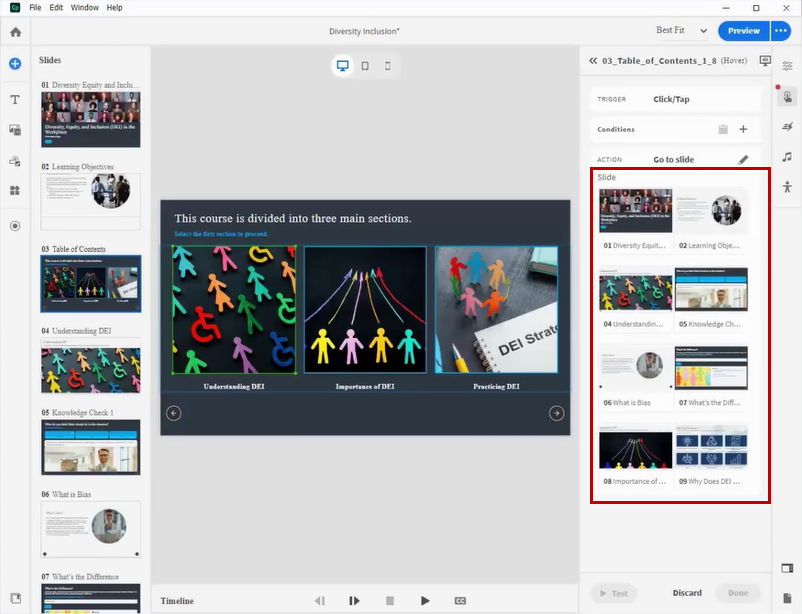
Select the target slide from the list and save the action by clicking “Done“.
adobe captivate

adobe captivate

Step 12: 

You can control the states for the clickable buttons by following the same process as you did for the “Next” button.

Step 13: 

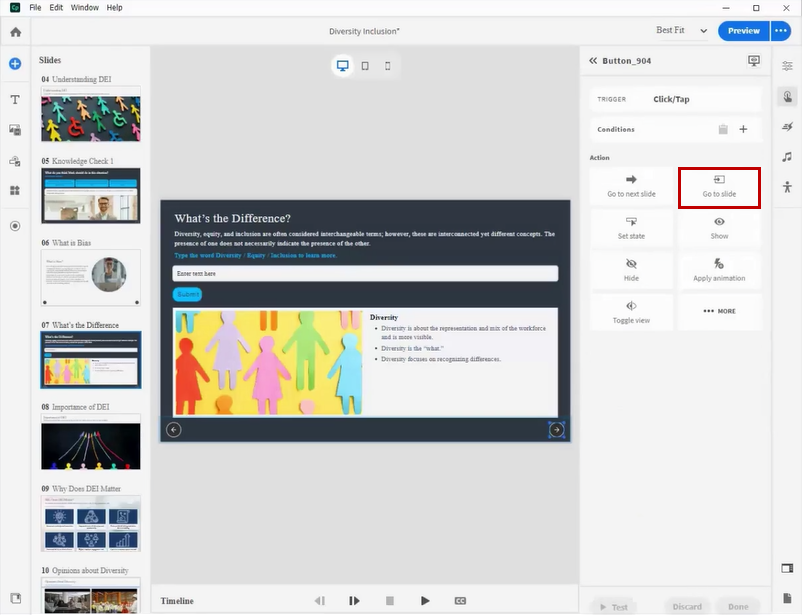
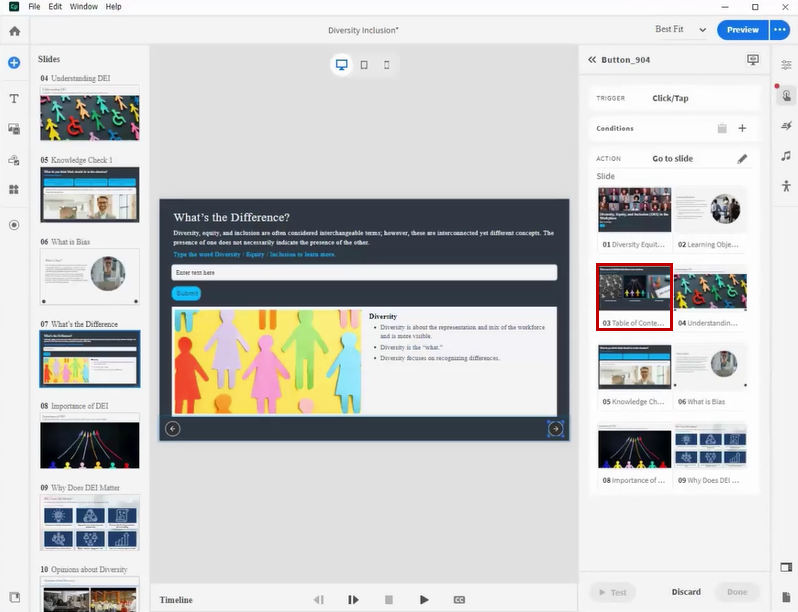
Navigate to the final slide of the first topic and assign an action to the “Next” button to “Go to slide” which leads to the branching screen.
adobe captivate

adobe captivate

Step 14: 

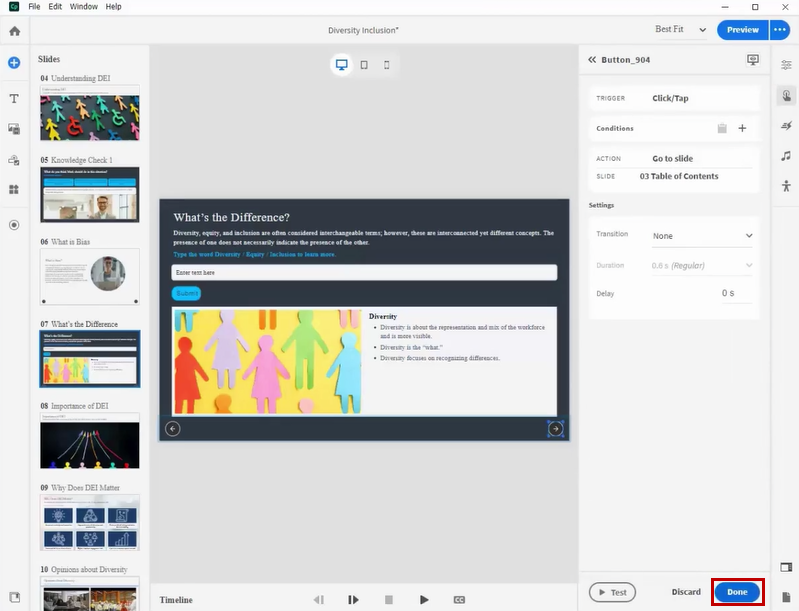
Click the “Done” button to save the actions.
adobe captivate

Step 15: 

You can repeat the same process for the remaining two buttons.

Step 16: 

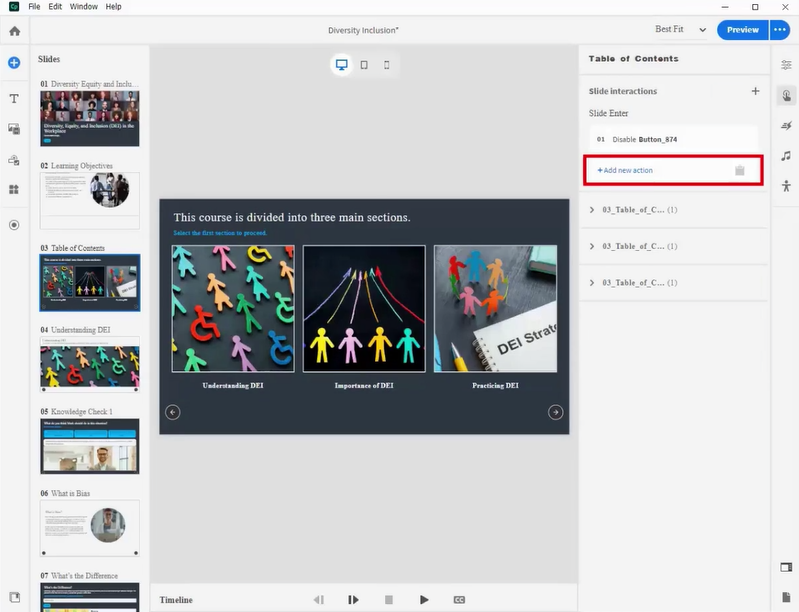
Go to the branching slide and create a new action by clicking on the “+ Add new action” option.
adobe captivate

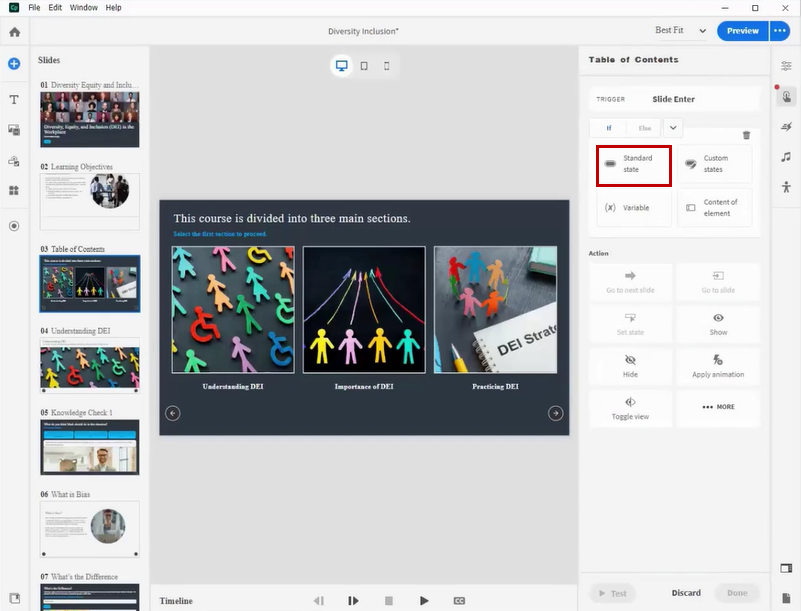
Step 17: 

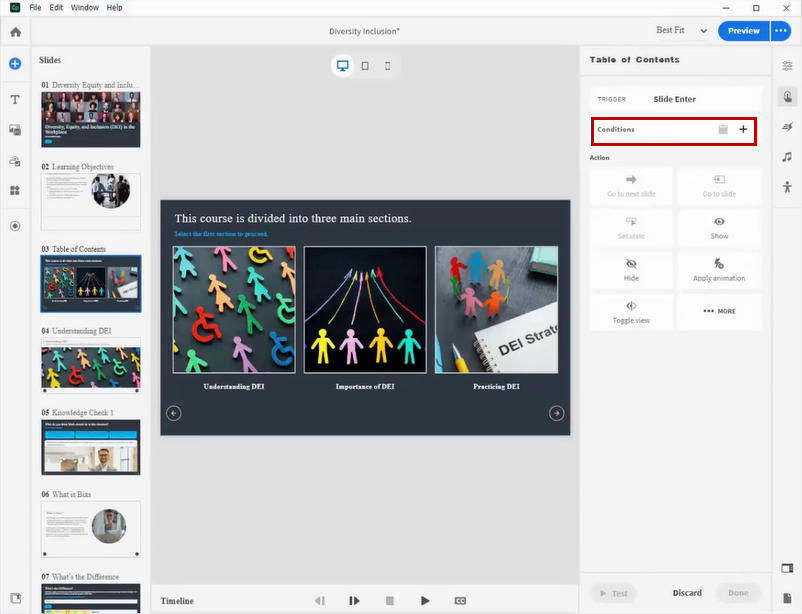
To add a conditional action, click the “+” symbol and select “Standard state“.
adobe captivate

adobe captivate

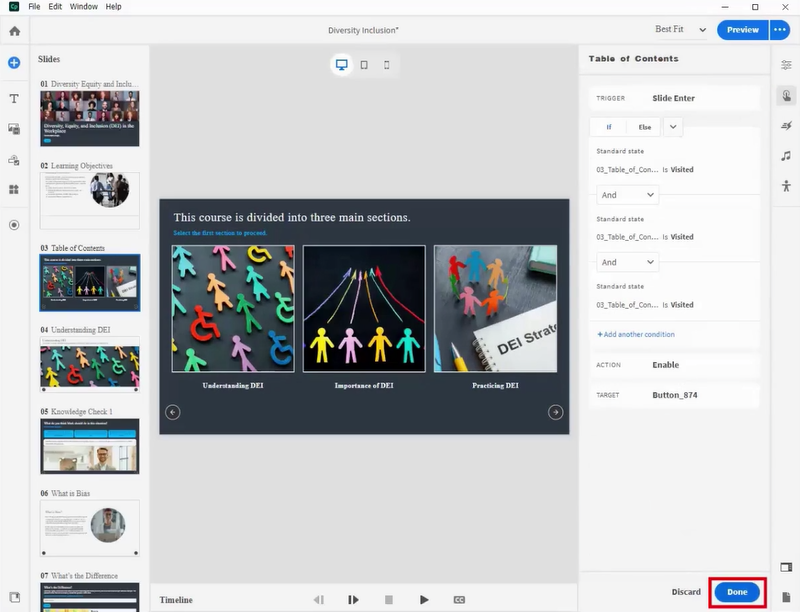
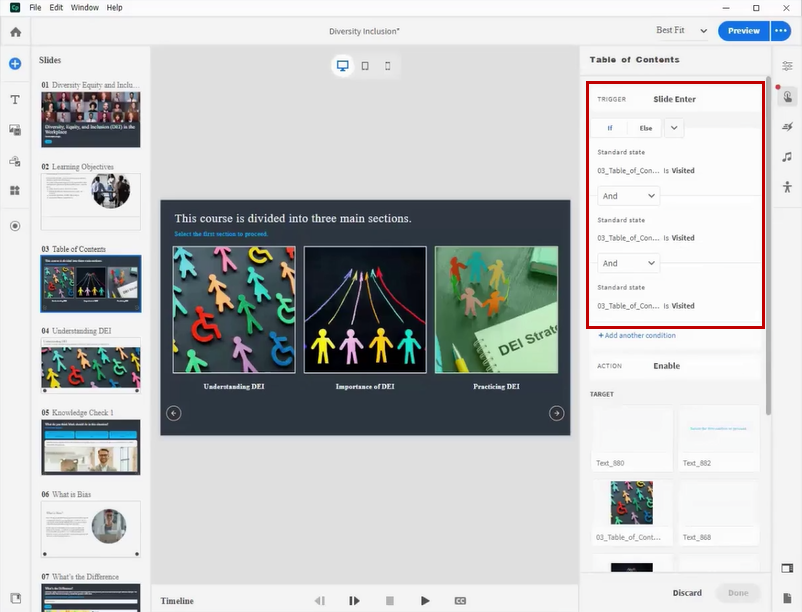
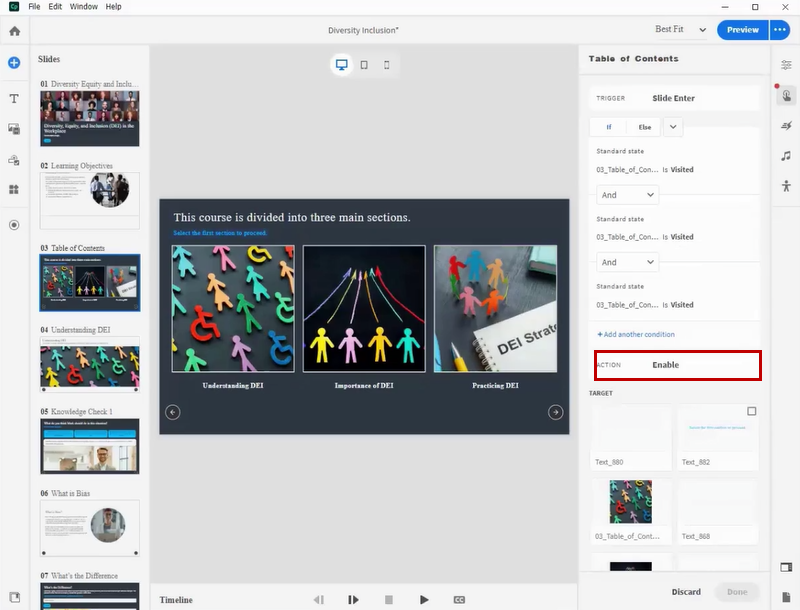
Step 18: 

Include a “Visited” state condition for all three buttons, and select the “Enable” action by clicking on “More“.
adobe captivate

adobe captivate

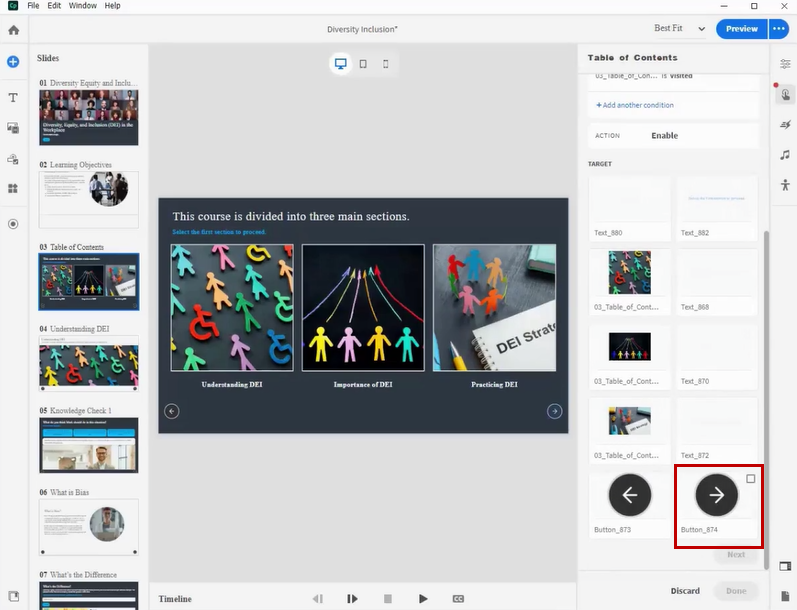
Step 19:

Choose the “Next” button from the list, then click “Done” to save the actions.
adobe captivate

adobe captivate

Save the source file and publish it to observe the slide navigation behavior. When compared to the previous version of Captivate, you’ll find it easier to create branching screens in the latest version.

0 replies

Leave a Reply

Want to join the discussion?
Feel free to contribute!

Leave a Reply Cancel reply

Your email address will not be published. Required fields are marked *

Share this entry
  • Share on Facebook
  • Share on Twitter
  • Share on Pinterest
  • Share on LinkedIn

ARTICULATE STORYLINE POSTS

  • step-by-step guide to customize quiz feedback colors in rise 360
    How to Customize Correct and Incorrect Answers Feedback Colors in Articulate Rise 360June 27, 2025 - 4:40 PM
  • removing labels and numbers from process blocks in articulate rise 360
    How to Remove Labels and Numbers from Process Blocks in Articulate Rise 360June 20, 2025 - 3:07 PM
  • easy-online-course-creation-ispring-suite-swift-elearning-services
    Create Online Courses with Ease Using iSpring Suite – The All-in-One eLearning Authoring Tool for PowerPointJune 16, 2025 - 11:18 AM
  • how to adjust padding in articulate rise 360 content blocks for custom e-learning
    How to Adjust Padding in Articulate Rise 360 Content Blocks for Custom E-LearningJune 9, 2025 - 5:23 PM
  • swift elearning services focuses on crafting custom elearning courses that enhance digital learning experiences.
    How to Use Snapshots to Recover Deleted Lessons in Articulate Rise 360April 23, 2025 - 3:58 PM
  • swift elearning services provides articulate 360 localization, offering tailored elearning solutions that adapt your content for global audiences.
    Articulate 360 Localization: Create, Translate, and Manage Training with EaseApril 17, 2025 - 11:24 AM
  • custom elearning solution with jump-to-time video control in storyline 360 for interactive video navigation.
    How to Use Jump-to-Time Trigger to Control Video in Storyline 360April 11, 2025 - 10:51 AM
  • how to import slides from other storyline projects
    Articulate Storyline 360 – How to Import Slides from Other Storyline ProjectsMarch 25, 2025 - 5:52 PM
  • ohs-traffic-control-training-for-construction-workers-featured-image
    OHS – Traffic Control Training Course for Construction WorkersSeptember 9, 2024 - 5:56 PM
  • ohs-road-traffic-control-training-for-road-maintenance-workers-featured-image
    OHS – Traffic Control Work Zone Safety Training for Road Maintenance WorkersAugust 1, 2024 - 3:22 PM

Get a Free Prototype Customized with Your Content.

Our Portfolios Explore Our Extensive Collection of eLearning Courses.

GET A FREE ELEARNING SAMPLE

We transform your training material into engaging, SCORM-compliant courses.

Request a Free Sample  

Our Services


  • Rapid eLearning Solutions

  • Custom eLearning Development

  • Flash to HTML5 Conversion Services

  • Mobile Learning Solutions

  • Translation and Localisation Services

  • Gamification eLearning

Our Office Address

Asia: 704, Topaz Plaza, Punjagutta, Hyderabad, Telangana, India 500082

Australia: P.O. Box 107, Brisbane, Queensland, 4030

Canada: 750 Oakdale Rd Suite 56, North York, ON M3N 2Z4, Canada

USA: 12218 Old Gage Ranch, San Antonio, Texas 78245

Copyright ©2026 Swift eLearning Services.
  • Facebook
  • Twitter
  • LinkedIn
  • Youtube
How to create interaction with videos in Latest Adobe Captivatehow to create interaction with videos in latest adobe captivatehow to deactivate the skip navigation shortcut key for accessibility in articulate storyline 360How to deactivate the skip navigation shortcut for accessibility in Articulate...
Scroll to top